SFWA Website User Guide
Please add your own notes or instructions to this document as you see fit.
IMPORTANT: There are currently no instructions from me on how to add or setup either Events or Salon Rentals as these were already in place on the old site. These were managed through plugins, Quick Event Manager and NextGEN Gallery. Quick Event is still installed both in the main site and in the events.sfwomanartists.org subdirectory. It is in use for Salon Rentals but Events have been simply added to the Member Page at present.
Table of Contents
- Links
- General WordPress help
- Tips on using the new site
- Notes on NextGen image galleries and usage of Tags
- Notes on editing the Homepage
- Notes on adding and editing Exhibitions
- From Smarter Entry to Exhibitions
- Notes on adding and editing Artists
- Updating Salon Rentals
- Notes on other Pages
Links
- Link to this User Guide: http://www.sfwomenartists.org/sfwa-website-user-guide
- Link to SFWA Admin login: http://www.sfwomenartists.org/wp-admin
- NextGen Gallery documentation: https://www.imagely.com/docs/nextgen-gallery/
General WordPress help
This document won’t go into general WordPress help because this is readily available. At the top right of each page, you’ll find a Help tab with in-context help along with links to additional documentation in the WordPress Codex. You can find things like, managing the menus, uploading photos, using the editor, finding UI elements, etc.
Below you will find any custom additions and how the SFWA site specifically works. If you are having trouble with anything or you are spending too much time on something, send a detailed email with your issue to your administrator.
Tips on using this site
- ORGANIZATION of POST TYPES in the WORDPRESS BACK END: ‘Artists’ and ‘Exhibitions’ have their own sections under those names. They are not in the Pages list. Artists are here and Exhibitions are here. Posts are all the News. Events are managed the same way.
- ORGANIZATION of POST TYPES the WORDPRESS FRONT END: Each of the Post Types listed above have their own menu links on the front end.
- ORGANIZATION of IMAGE GALLERIES: Images are managed via the NextGen Gallery system. Access at http://www.sfwomenartists.org/wp-admin/admin.php?page=nggallery-manage-gallery
- PAGES: Pages are everything else including Featured Sculpture and Featured Fine Art and Jewelry.
- WORKFLOW: When you set up a NextGen Galleries it will assign the Gallery ID# which is used on the Exhibition page in order to populate that page with the images. If you set up the Exhibition first, you will have to go back to the Manage Gallery page to note the ID# Exhibitions require the Gallery !D# as well as the Month and Year in the appropriate fields.
- IMAGE for the TOP SECTION on the HOMEPAGE: The top featured section should be 1920px x 575px. This image will cover the background. I’ve used two images next to each other for simplicity and to minimize cropping (for reference, here’s that image). I would suggest no more than three different images here. There is a colored, gradient overlay (the three SFWA colors) that sits on top of the image you upload.
- IMAGE SIZES for SECOND FEATURED SECTION on the HOMEPAGE: These should all be the same aspect ratio for consistency. I’m using 16:9 so something like 1000px by 563px. You can use whatever sizes you want if you don’t want to deal with it but that size will fill the column. The images are limited to 575px high in this section so for example if you use an image in a portrait orientation, that image will maybe only fill up a third of that right column.
- IMAGE FILE SIZE / QUALITY: Images should be no more than 1MB in size. When saving an image in your photo editor, make the quality something around 80. You do not need to upload files at max quality settings.
Notes on NextGen image galleries and usage of Tags for Artist’s Galleries
These are managed in the same way as before so I won’t go into them to deeply; hopefully you already have notes on how to to that.
Adding images
You can upload them to an existing gallery using the dropdown or by choosing to create a new gallery.
Updating Existing Galleries
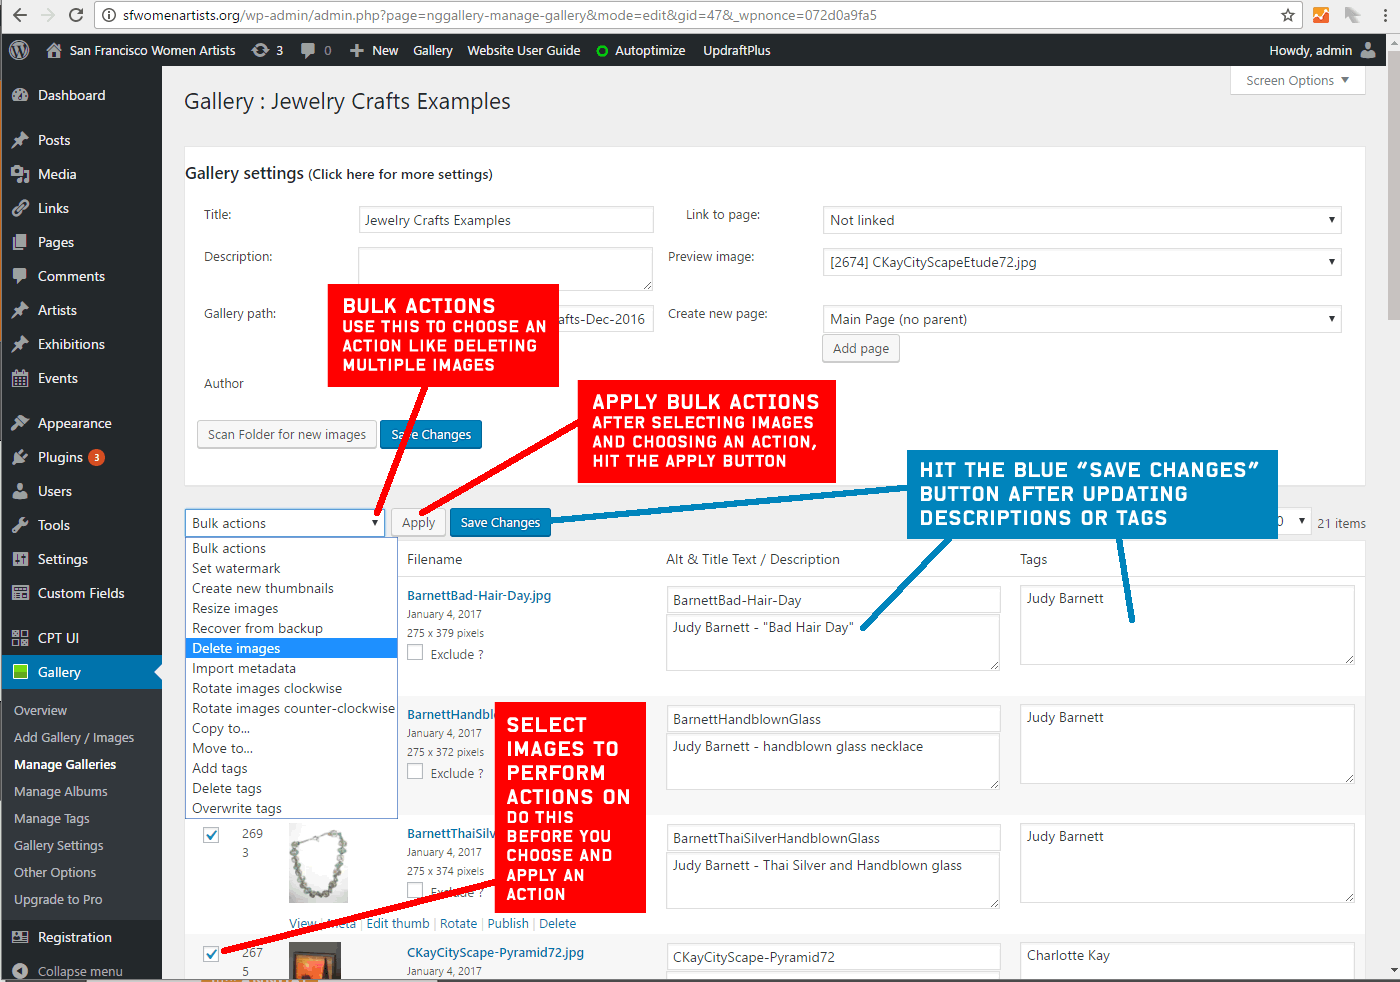
Using the link above, find the gallery you want to update and click it’s link. You’ll see a list of the images in that gallery and you can update them using the Bulk Actions dialog box. You can also update individual images in these galleries like replacing a single image or updating a Description or adding or removing Tags. Images are set to load in alphabetical order. All Smarter Entry images begin with LastnameFi_xxx.jpg.
See the screenshot below for guidance.
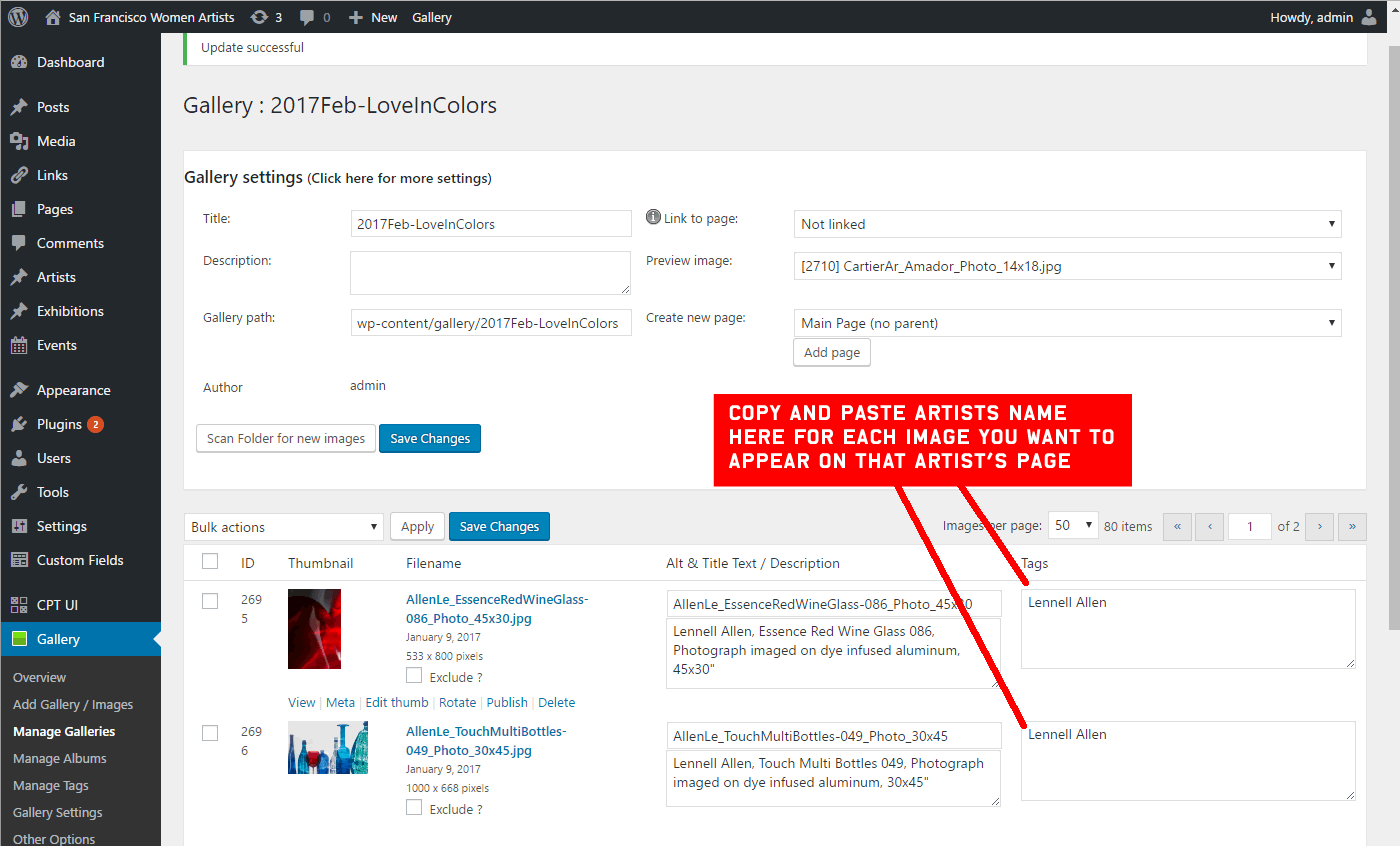
Using Tags to include images in the slideshows on individual Artist pages
We TAG images so they appear in the slideshows at the top of the Artist’s Pages. Once you TAG them, they are automatically pulled into the slideshows at the top of each Artist’s page. Tags should not be added until the show is current. That would happen at the same time as the new homepage goes up – the time the previous show comes down. You can see where tags go in the screenshot below. If you know the art in the image is already in the Artist’s page, do not tag it or it will be repeated in the slideshow.
IMPORTANT: Also worth noting is that to REMOVE any images from any of the Artist’s slideshows, you will need to find the gallery it was in and then remove the TAG from that image in that gallery.
From Smarter Entry to Exhibition
— A time sensitive and time-limited operation determined by show dates and artist notification dates set by gallery.
Submissions for each show are handled through the proprietary Smarter Entry platform. As soon as the juror has completed selections for the relevant exhibition, the ‘Juror Accepted Report’ is downloaded from Smarter Entry. This consists of a spreadsheet with thumbnail images and a folder of full sized images. The first step is to rename each of the images so that each shows the last name, title, medium and hxw of the piece. As usual, no spaces or any punctuation beyond dot, dash or underscore is allowed. Those renamed images are then loaded via the Add Gallery / Images page into a new gallery called monthyear-showname, e.g. 2017Mar-CelebratingHer. The next task is to enter the artist’s full name, artwork title, medium and dimensions into the description box on each line. It is important here to spell the artist’s name and the work title correctly as this is what will show when the image is clicked. Details can be checked via the spreadsheet if not complete from the image name. The three juror’s choice pieces should also be annotated. The artist name TAG should not be entered at this time. The gallery page should be saved a couple of times during entries to prevent losing the data.
Once the gallery is set up, the exhibition page needs to be created. The easiest way to do this is to copy the information from the current exhibition onto a New exhibition page and then change the title, dates, juror, Month and Year and gallery ID number. Choose a featured artwork to represent the exhibition (from the nextgen gallery since that has just been created) or use the postcard image. As always, check that your page looks as you expect by clicking ‘Preview Changes’ before publishing.
As soon as the above steps are complete, the spreadsheet and the gallery page URL, alternates and Juror’s Award winners are sent to the gallery director so that the submitting artists can be notified.
The final steps are to create the post for Juror’s Choices for which is again most easily done by copying the previous one and then updating the images (from the nextgen gallery) and the artist information. The post should be ‘Scheduled’, not ‘Published’) so that it coincides with the end of the current show, e.g., the Saturday before the show opening. At that point the artwork for the new show should be TAGGED with he artist name so that the images do not show up on the artist’s page before the show opens. (If the artwork has been shown in previous exhibitions, it should not be TAGGED at all or it will be duplicated in the band of works on the artist’s page).
Notes on editing the Homepage
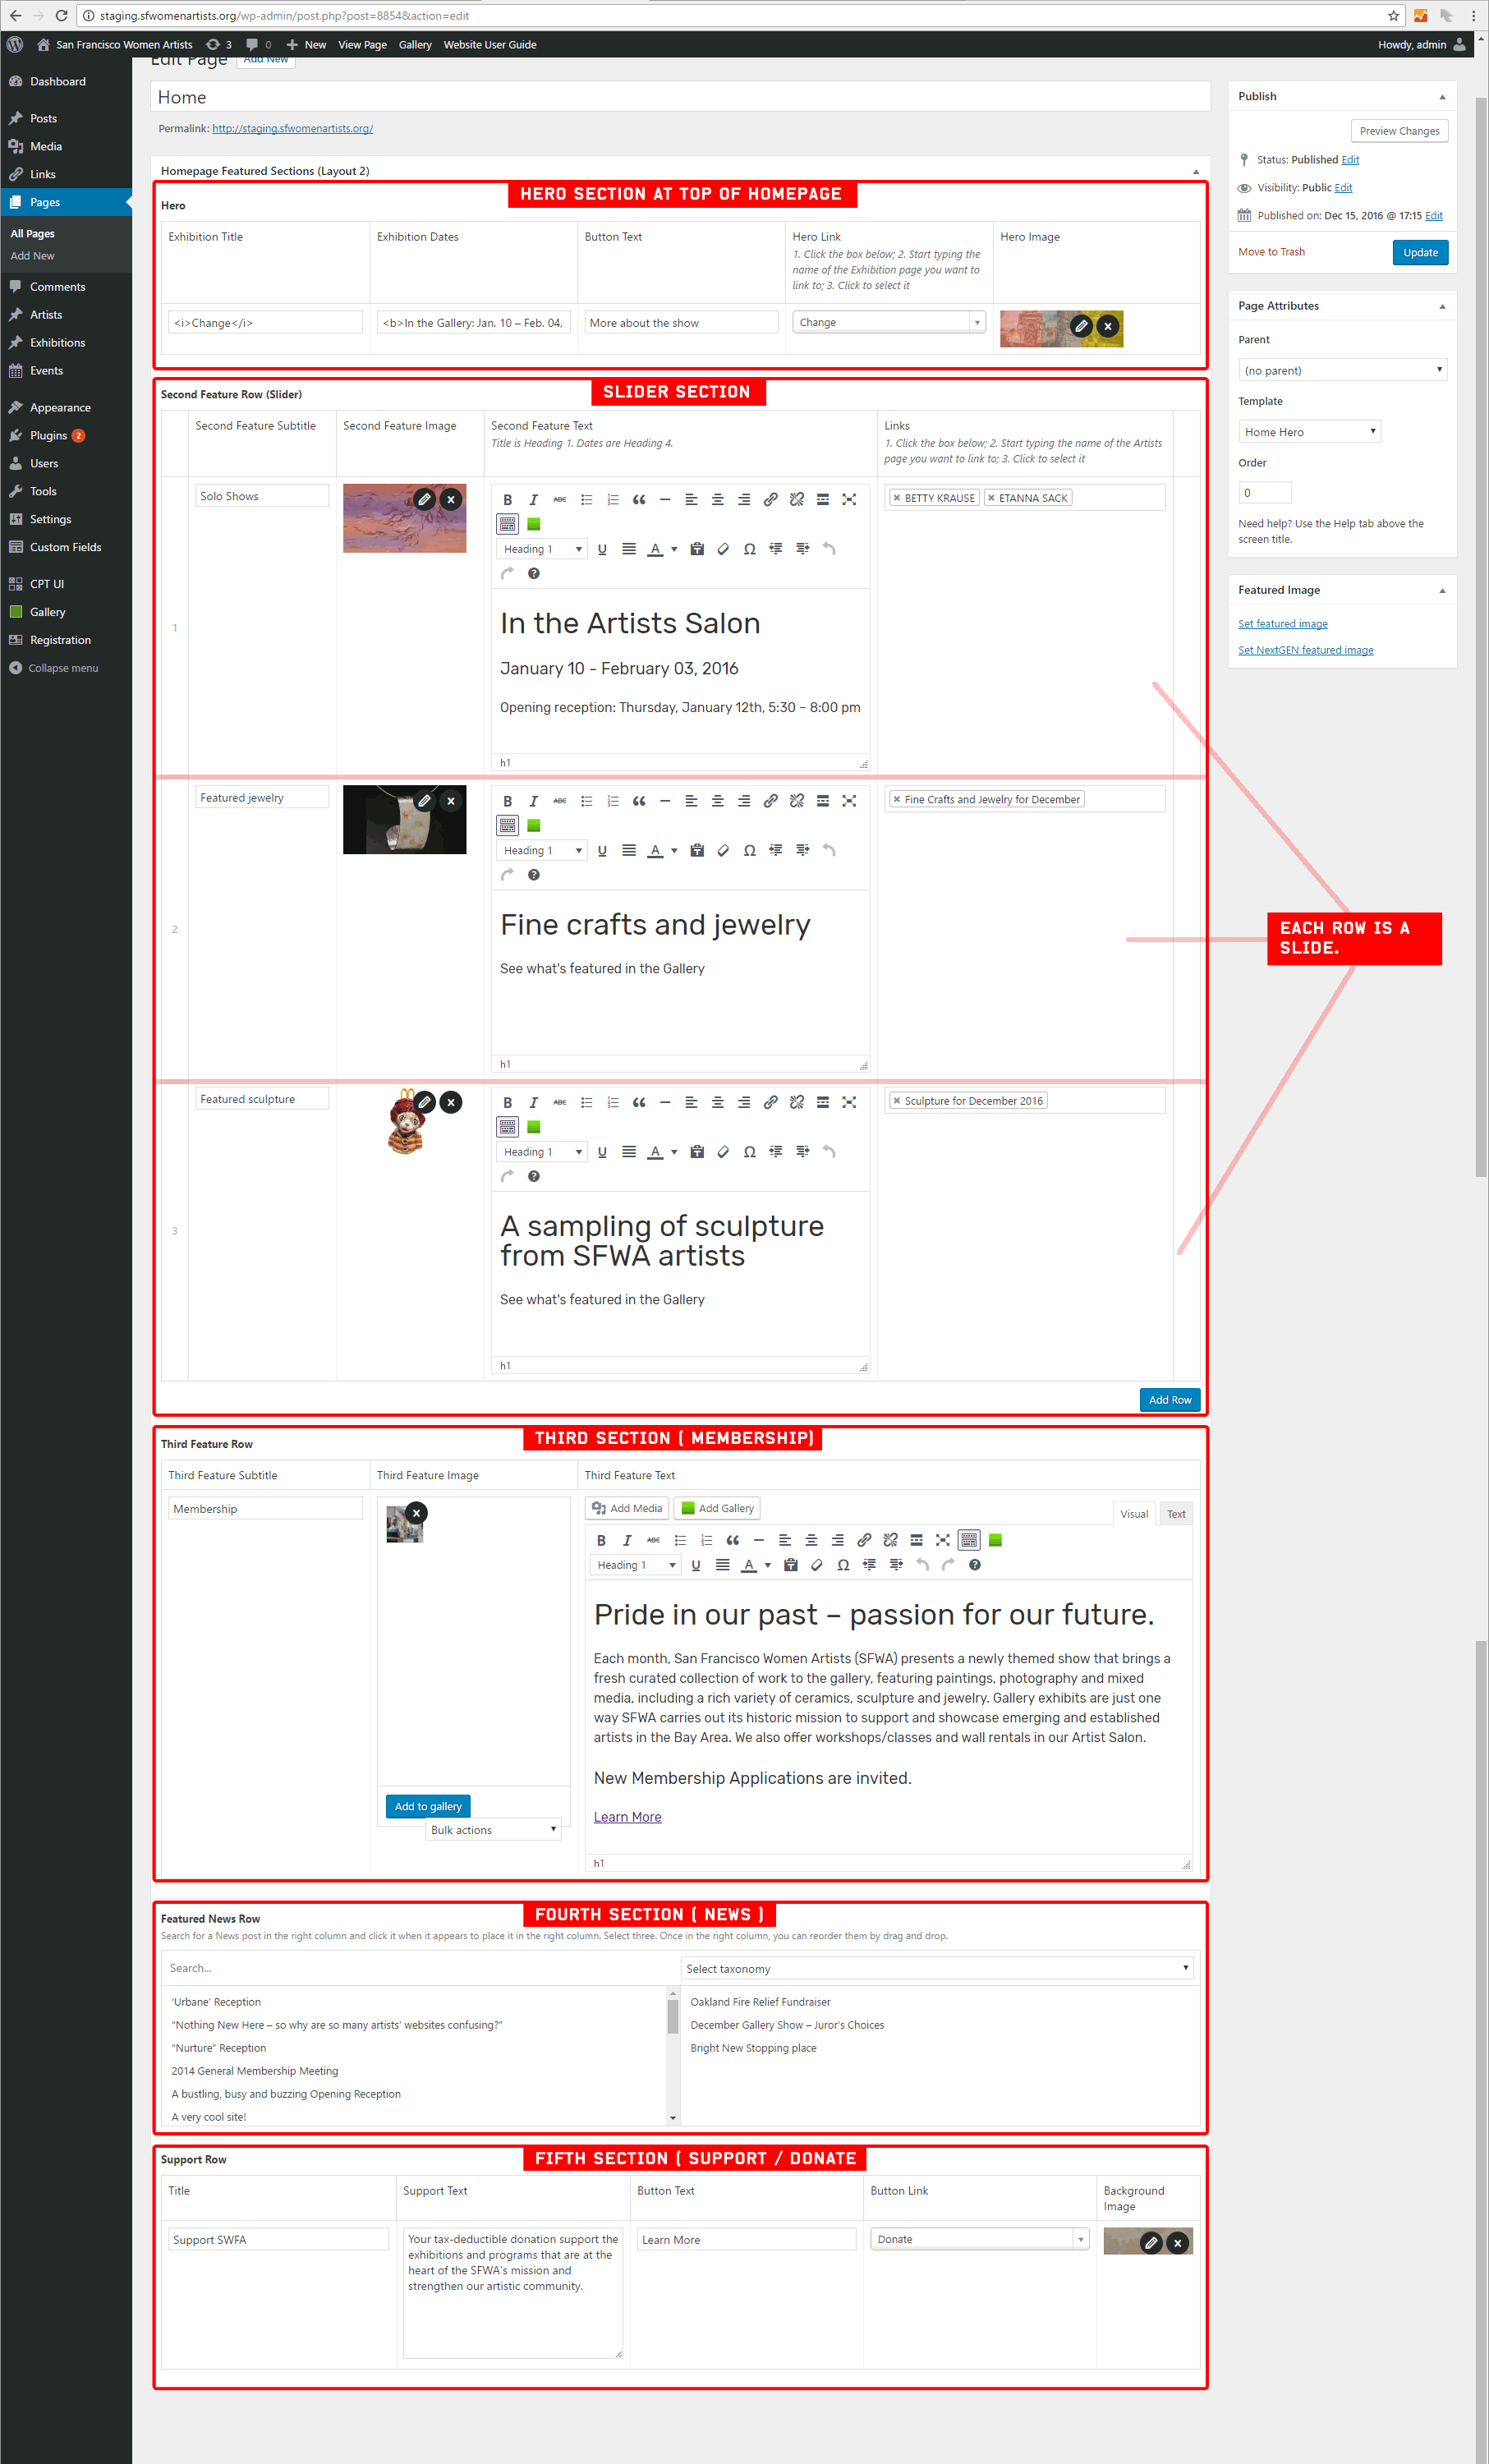
There are five sections on the homepage and each corresponds to a section in the backend. Those sections are titled and labeled and are noted on the screenshot below. Most of the fields are self explanatory so let me know if you have any questions.
IMPORTANT: The second slider section and the fifth support/donate section on the homepage are global sections that also appear on other pages. The slider also appears on the Exhbitions page underneath the Current Exhibition. The donate section appears at the bottom of every page. You just have to update these sections here on the homepage.
Notes on adding and editing Exhibitions
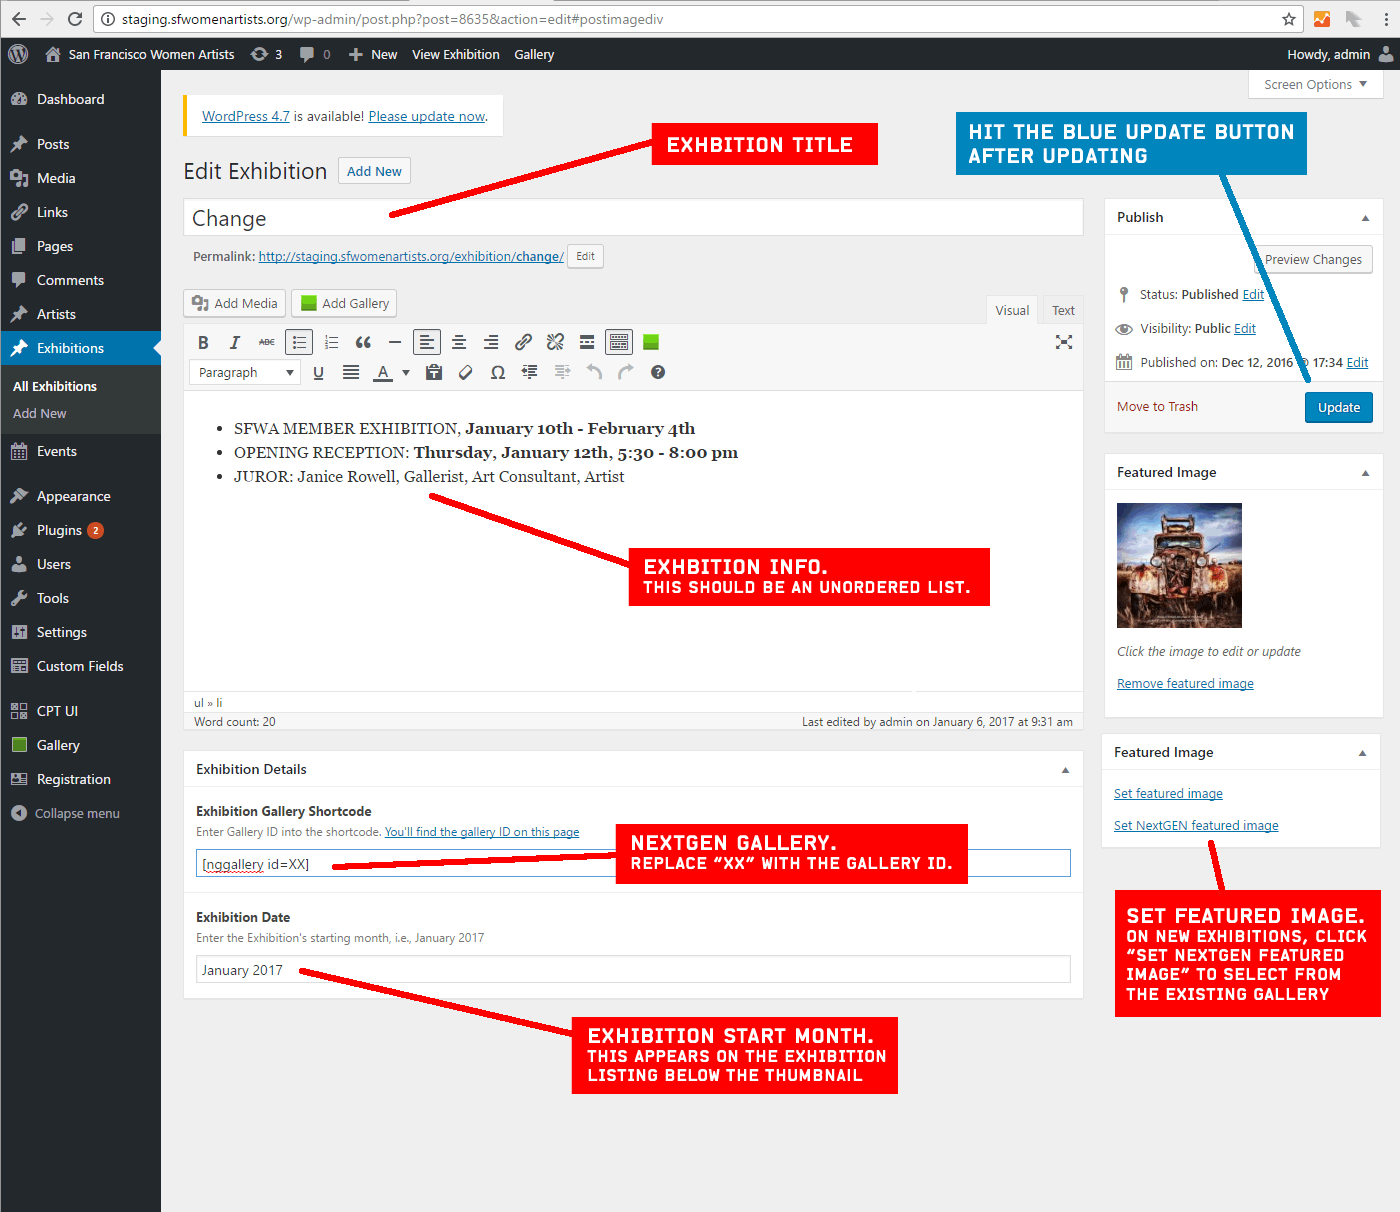
Go to EXHIBITIONS from the admin menu to Add or Edit Exhibitions. Click ADD NEW for a new one and ALL EXHIBITIONS to get to the list of all your Exhibitions. The screenshot below will introduce the fields on the Exhibition page.
IMPORTANT: A new section I’ve added is the EXHIBITION DETAILS section which contains the Exhibition Gallery Shortcode and the Exhibition Month. You will need the ID of the NextGen gallery you setup for this Exhibition; there is a link in the description for that field if you need it.
Notes on adding and editing Artists
Go to ARTISTS from the admin menu to Add or Edit Artists. Click ADD NEW for a new one and ALL ARTISTS to get to the list. The screenshot below will introduce the fields on the Artist page.
If there is a bio, paste it into the page and add the headshot, if provided, aligned left, at the beginning of the first line. The artist’s full name should be bolded in the first line. The linked website should be entered at the end of the bio, always set to open on a separate page so that we never lead viewers completely away from the SFWA site. If the bio is not written in third person as requested, you can either edit it or write to the artist to redo it. Sometimes editing will also be necessary to correct grammar.
If there is no bio, the artist’s website should be entered into the Artist’s Website field. That creates a listing on the Artists page and a symbol to take viewers to the external artist’s website (opening in a new page).
Always use the ‘Preview Changes’ button to make sure it looks like you intend before publishing for the world to see.
Future Work
Some future work can to be done on the Artist’s posts:
- The Artist’s name should not be all caps. This isn’t that important but future names should just be regular case. If we find the time, we can go through and update all uppercase names.
- If desired, a headshot or artwork Image for each Artist can be added – be sure to indicate “left” when you insert it via the Media page so that it doesn’t stand alone above the text. As the artist’s work is included in exhibitions and tagged appropriately, it will show up in the slides above the artist’s bio

Notes on editing Salon Rentals
Salon Rentals are managed under Events in the left sidebar:
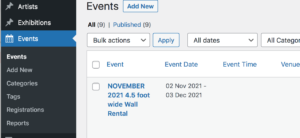
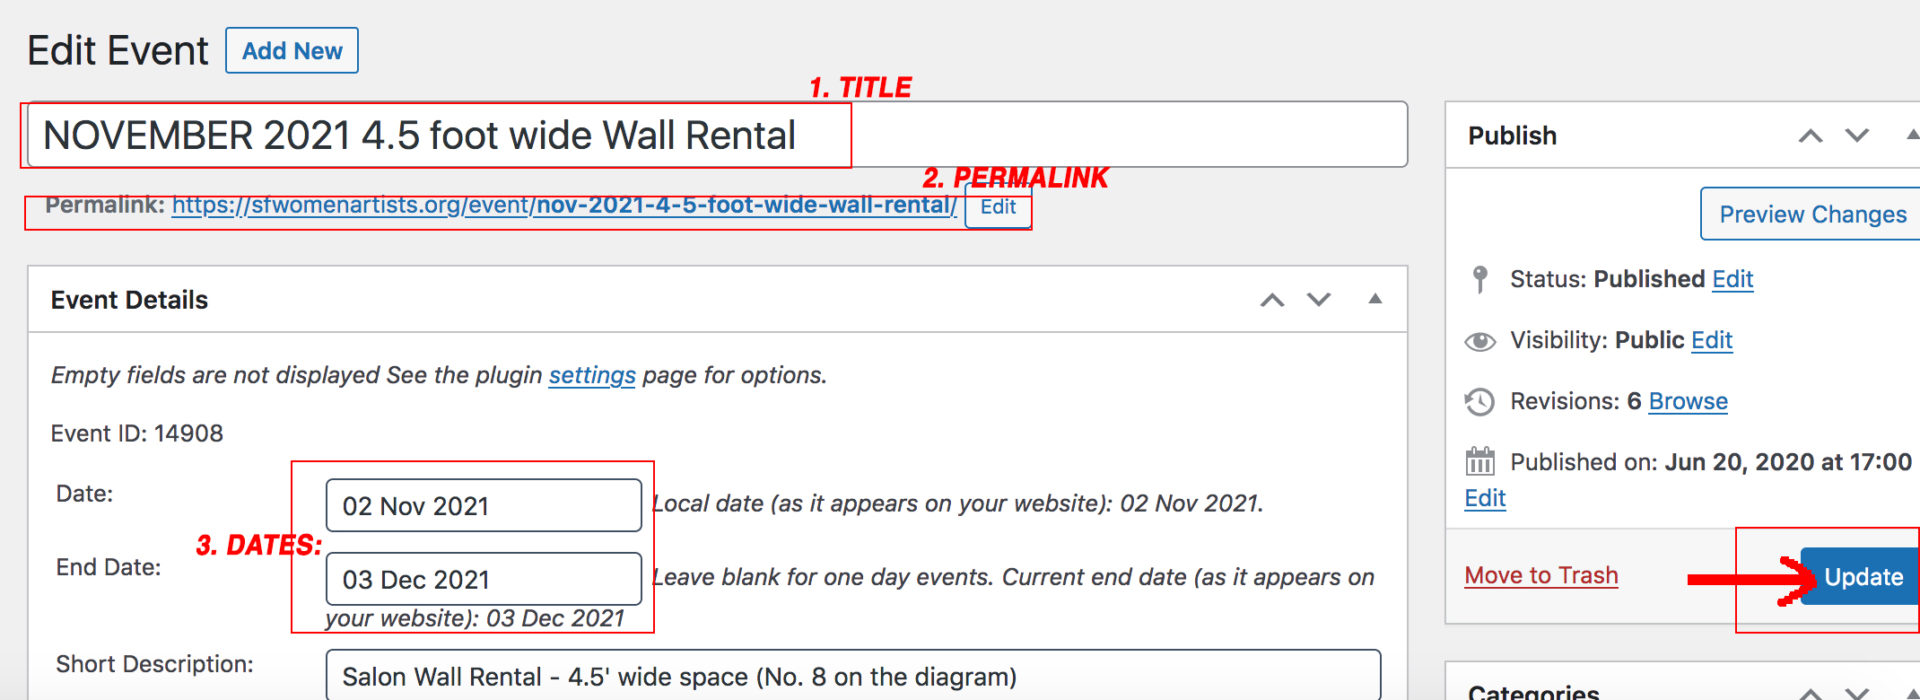
Each Month’s listing has 3 Wall sizes, 8′, 6.5′ and 4.5′. The easiest way to add current salon rentals is to overwrite an expired month. First go to that month’s bookings under Registrations (see image above) and delete all registrations for all 3 wall sizes for that month. Then go to those 3 events and change the month in title and the permalink (just under the title), and then the start and end dates. Then preview it to be sure it’s as you intend and click Update. That automatically deletes the previously titled salon rental month.
Page shot of the things you will change:
Notes on other Pages
All the other pages have various sections that you can edit and add to. I’ll get a screenshot up of these as soon as I can. [jk]
